Tuesday, October 3, 2017

Supplement Review

I wanted to dedicate one post to my personal review of supplements I have taken to help increase my milk supply. The more supplements I try, I will add them to this post. 

The opinions, views and experiences shared in these reviews may not be the same as yours or others. Keep in mind different products perform differently for each person. 


MotherLove


More milk special blend, more milk plus, fenugreek & malunggay: I decided to review these together instead of separately because thats how I took them. I have taken more milk special blend and more milk plus for years (capsule and liquid form)while nursing different children. It has always assisted in producing enough milk for my children. However it wasn't until this year that I started exclusively pumping and being able to measure my output. It also wasn't until this year that I added the MotherLove tinctures (fenugreek & malunggay). I can't say that the tinctures really did anything to increase my supply while I was already taking the more milk special blend supplements and the more milk plus supplements. With round the clock pumping my max output while using the MotherLove supplements was 18oz in a day. But my average was about 14oz. Overall I would recommend the more milk special blend and the more milk plus. The capsule and the liquid form work the same but I would recommend the capsule form to avoid the terrible taste of the liquid. Only con is that you need to wait 20 min before and after taking these before you can have any liquids. Maximum about of liquid you can drink with these is 2 oz. Keep in mind that fenugreek can upset the stomach of some. I did notice it makes me a little bit more gassy but that wasn't a deal breaker for me. It did not make any of my kids any gassier. 


Legendairy Milk


Cash Cow:
Liquid gold: I tried these immediately coming off of using the MotherLove supplements (mentioned above). I did not see an increase in supply, however it did maintain the same supply as my MotherLove supplements  I did however notice the fat content of my milk did increase.
 Milkapalooza: I took these after trying Liquid Gold and my milk supply decreased significantly dropping to a mere 9 oz in a day. I took this in combination with Pump Princess when I saw my supply drop so low. Taking them both simultaneously had no effect. 
Lechita: 


Pump Princess: I took these while taking Milkapalooza in the hopes that it would help increase my supply after such a significant decrease. This did not help my supply in the least. 


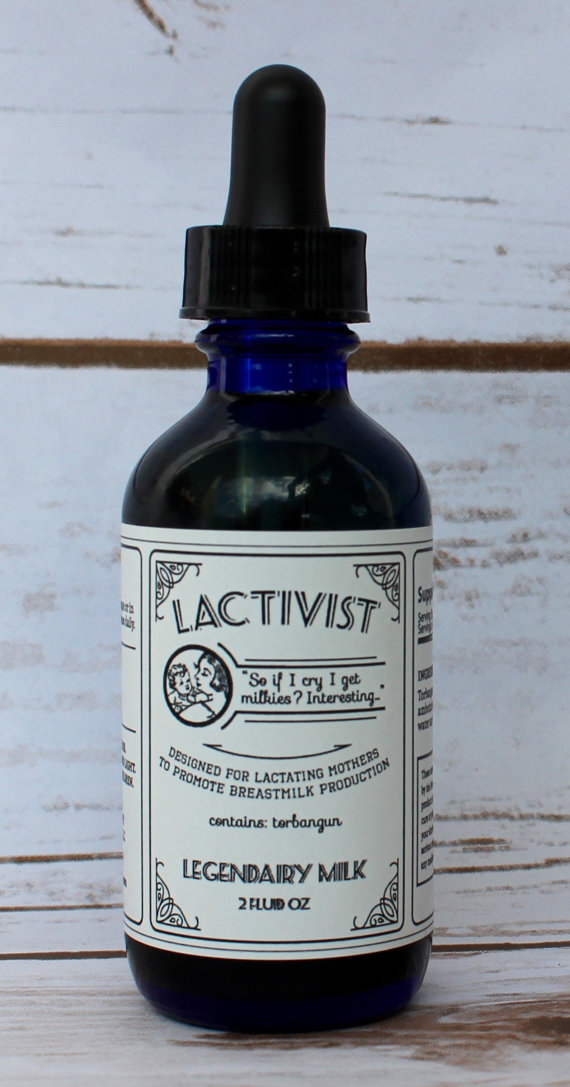
Activist: This product sells out fast. I mean FAST. Its available through Legendairy Milk's etsy store found here. They email their customers when this product will be listed and you have got to be fast. 40 bottles of this sold out in about 60 seconds. I started taking this while taking Pump Princess in an effort to increase my supply from the nosedive it took after taking Milkapalooza. Recommended dosage is 1 dropper full 3-4 times a day. The thing is, when you fill the dropper, it is nowhere near an entire dropper full. It maybe fills up about 1/2 of the dropper. (see photo on the right)I saw no increase at all by filling it up as much as it would fill (1/2 of the way). Meanwhile I was also taking Pump Princess. I increased my dosage to 3 droppers (partially filled) 3 times a day. I did see a slight increase the first day of about 1 1/2 oz more by the end of the day.  I didn't see much more of an increase for the month that I was using it. I decided to give it another try and buy it again to see if I just needed to give it more time. The second time around, it didn't sell out as fast because there were more in stock. But within about 5 minutes or so they were sold out of Lactivist. This time around I got the following note with my order when I received it: "Quick note: to suck up more of the liquid in the dropper, try squeezing the bulb twice in quick succession. If the dropper fills 1/2 to 2/3 of the way, that would be considered 1 dose. If you take 3 droppers a day, the bottle will last 3 weeks. 4 droppers a day will last 2 weeks. Happy milk making!" The tip did work in filling the dropper more fully. 


Mother's Milk
Mother's Milk Tea: This should be a staple in any breastfeeding mothers diet. I can't breastfeed and not have this. I literally start taking this as soon as I get to recovery in the hospital after giving birth. I ask for a hot cup of water and start taking the tea. You need to have at least 3 cups a day to see a difference. I also enjoy the taste. I probably would continue drinking this even if not lactating. Its that good. Keep in mind some mothers have reported it making them gassy. Ive also heard some mothers say it makes their baby gassy too. I personally have not had that experience. 

Milkmakers 


Milkmakers Oatmeal Chocolate Chip Lactation Cookies: I picked these up at my local Walmart. They tasted pretty good but I found them to be a little on the dry side. More importantly, I didn't see any increase after eating these. Keep in mind I only ate them once. I checked the bag as well as their website for recommended dosage amount and I didnt find anything. Im assuming you need to eat 2 cookies a day for a while to see any increase. However that is a big assumption on my part. I have nowhere to even check this information. The only thing I could find was on their website where it has a quote saying "100% of moms see an increase within a week". These weren't the cheapest cookies so I certainly didn't plan to buy 7 packs to have one each day of the week. And I certainly wouldn't want to buy even more to help milk production beyond that at that cost. I will add that they do sell Milkmakers as a bag of ingredients where you can prepare your own cookies too. So that might be more efficient. But not as cost efficient as making your own cookies at home.

Wednesday, September 27, 2017

Legendairy Milk Discount!

I was able to get my hands on a discount towards any Legendairy Milk products and Im passing the benefits on to you! All services now come with coupon codes for any Legendairy Milk purchase!

Tuesday, September 19, 2017

Flange / Breastshield Sizes

Did you know flanges/breastshields come in different sizes? Did you know that your breasts can have two different sizes? And why is using the correct size so important? 

How do I choose the right size?

Well let me start off by saying that if you are using a flange that is too big or too small, it may cause lower milk output. It really is THAT important. The inner diameter of the breastshield or (flange) should be 1-2 mm larger than the diameter of your nipple. AFTER a pumping session or 3-5mm BEFORE a pumping session. You should be able to see free movement of your nipple during pumping and there should be little or no suction of the areola into the tunnel of the breastshield. 

EXAMPLE: If your nipple diameter AFTER pumping session is 18 mm, a 19 mm breastshield is best. If your nipple diameter is 18 mm BEFORE a pumping session, you can try a 21 mm breastshield. And don't forget to measure each breast as it is possible to have two different sizes.


How to measure the diameter of your nipple?

Download the nipple caliper file here, print it out, cut through the red line, fold along the green dots then you have made yourself a nipple diameter measuring tool. See below for the finished ruler.


What if I have inverted or flat nipples?


Sunday, September 17, 2017

Search Feature

Did you know that you can easily search any topic on my blog and bring up related posts? Just find the search box in the upper left hand corner and type your topic. It's that easy!

Friday, July 7, 2017

Expressing Your Breastmilk

Expressing your milk by hand or with a pump helps you establish and maintain your milk production if you're separated from your baby or if he/she isn't breastfeeding well. And if your milk production is low, expressing can help increase it whilst also providing extra milk to give your baby.

When a baby can't breastfeed
Breastmilk is especially important for babies who are unwell. And if your baby can't breastfeed because of prematurity he/she will benefit from every drop of breastmilk you can give him/her. Some babies have conditions which mean they can't feed at the breast, they can still have your milk. If your full term baby is taking a while to learn to breastfeed, expressing protects your milk production and gives you both time to practice.

The prospect of expressing might seem daunting at first but giving your milk is something you can do that will make a real difference to your baby's short and long term health.

Return to work or separation
When you can't be with your baby, expressing maintains your milk production and helps you avoid engorged breasts during the separation. It also means your baby can continue to have his/her familiar milk when you're away.

Making more milk
(I first want to direct you to two previous post I made about increasing and boosting your milk supply. They are here and here.)You Teach your breasts to make more milk by removing the milk. Full breasts signal to your body to slow down milk production, so don't wait for your breasts to fill up before expressing, as this will mean a lower milk supply over time. The more thoroughly and frequently you remove milk from your breasts, especially in the early days and weeks, the more milk you will make and the greater the benefit for your long term supply. If you're expressing to establish milk production, making extra milk in the early days can make it easier to produce more milk later on to keep up with your baby's needs. Milk can always be frozen and used later. If you are expressing to increase milk production remember a well-attached baby is far more effective than any pump, so do seek help to improve positioning and attachment so your baby can feed more effectively when at the breast.

Pumps
You can simply use your hands to express, or you can buy or rent a pump. Your choice of pump will depend on your reasons for expressing and your circumstances. (Keep in mind many moms now qualify for free breast pumps. Ready this post for more information.) If your baby can't yet feed directly from the breast, or if you need to greatly increase your milk production then consider a hospital-grade double electric pump. Such a pump lets you adjust the suction and pumping speed (cycling) and is designed for long-term use. Many hospitals have these pumps available for use on the ward. Some have pumps that you can rent and take him for use, or you could rent one from a pump manufacturer.

For occasional pumping a smaller electric or hand pump may be sufficient. WIC (program for women, infants and children) has been known to provided breast pumps for free for qualifying women. Check out WIC's website and check to see if your are provides this service to qualifying women. Or you could just hand express. For more on hand expressing click here.

Double pump set: Hire pumps and some mini electric pumps come with two pump sets. Double pumping (expressing from both breasts at once) improves milk flow and saves time.


Check fit: Check that your pump flange and nipple tunnel fits you comfortable. If too much of your areola is pulled into the tunnel during pumping it can cause rubbing and soreness. If the tunnel is too tight it can inhibit milk flow. Size varies between different makes and models, with some available in a choice of sizes. You may need a different size for each breast. 

Suction and cycling controls: Look for a pump with separate controls for suction and cycling (speed) so you can vary these to suit yourself.

Cleaning the equipment: Always wash your hands before expressing milk. If you're expressing for a premature or sick baby who is still in the hospital then you'll need to follow the hospital procedures for cleaning and sterilizing the pump parts. If your baby is healthy, pump manufacturers generally recommend washing with hot and soapy water. 

Tips for expressing

Relax! 
Successful expressing has a lot to do with your emotions and how you re feeling. The hormone oxytocin causes the milk in your breasts to be released (let-down). Oxytocin is released when you feel happy and relaxed. It can be difficult to relax if your baby is very ill and in the hospital, or if you feel rushed or under pressure. Make a conscious effort to put your mind at ease and use your senses to help trigger milk release. Hold or sit near your baby, or look at a picture or video of him/her, listen to a sound recording or hold and smell an item of his/her clothing. Relax your shoulders and take a deep breath to calm yourself before you begin. Try not to thank about how much milk you are producing - instead, try distracting yourself by reading, listening to music or relaxation CD, watching TV or even chatting on the phone. Some mothers who express long term build up a pre-expressing ritual that 'prompts' their breasts ti release milk.

Use your hands
When hand expressing, the skin-to-skin contact helps stimulate the let-down reflex. And your hands can remove milk from parts of your breast which the pump can't. Its also perfect for the first few days after birth when the small droplets of precious colosseum you make can be collected on a clean teaspoon. Combine hand expression with pumping. This can help you remove milk more thoroughly than with pumping alone. Each time you express start with hand expression to stimulate a let-down. Then alternate pumping (double pumping if possible) and massage/hand expression until the flow slows. Finish by hand expressing into the pump flange, or single pumping with intensive breast compressions, switching between breasts until you feel that no more milk can be removed.

  • Click here to see how 'hand expressing' can maximize milk production
  • Click here to see how to hand express
  • See more online videos listed in the Further Reading section of LLL UK's website and my post on hand expressing found here and experiment until you find the rhythm and technique that works best for you
Suction and cycling speed
When using a pump, set its suction strength so it feels comfortable. Aim for the lowest suction strength which effectively produces milk for you; higher settings can hurt and won't necessarily produce more milk. Encourage multiple releases by mimicking a baby natural sucking pattern. More on that here. Increase the cycling speed when milk flow slows and use a slower speed as flow increases again. Aim for at least 3-5 milk releases during the session. if single pumping, switching between breasts several times can yelp trigger milk releases.

How often?
If you need to establish milk production without breastfeeding your newborn baby, aim to express 8 -12 times per 24 hours including at least once during the night to mimic a baby's natural breastfeeding pattern. It might help to plan when to express during the day (e.g. on waking, after breakfast, mid-morning, after lunch, mid afternoon, early evening, twice during the evening and once at night).
  • Once your milk supply is well established, you may find that you can maintain your milk production with fewer expressing sessions.
  • You don't need to express at evenly spaced intervals- little and often can be more effective than long sessions. 
  • Express until milk flow stops, then have a short break and come back to it- even a few extra drops of milk or expressing for a few minutes here and there make a difference.
  • Expressing several times (cluster pumping) during the evening can help you increase the number of times you remove milk per day, so increasing your milk production. 
  • If you're expressing to increase milk production, or because your baby isn't yet feeding well at the breast, do it after or between feeds to ensure your breasts stay well drained. This will stimulate them to make milk faster.
  • If you are expressing at work or for a short term separation for you check out this post and this post for useful suggestions. 

Further Reading

Other Websites
Hand expressing:

Source: https://www.laleche.org.uk/expressing-your-milk/ Written by mothers of LLLGB

Hand Expression Of Breastmilk

If you are pregnant or breastfeeding. milk expression by hand is a useful technique to learn. It's a handy way to relieve engorged breast. You can also use it to stimulate milk production and provide milk for a baby who is not breastfeeding well or needs more milk.

Why Hand Expression?

  • Skin-to-skin contact with hand expression encourages the milk ejection relax (MER) or 'let-down reflex'.
  • Mothers usually get more milk using hand expression alone or complied with pumping that using just a pump.
  • It requires no special equipment and is always available ,even in emergencies.
  • Its convenient and free.
Hand expression is particularly useful if you need to express colosseum during late pregnancy (see this article for more information) or in the first few days after birth. It makes it easy to save every drop of precious colostrum.

If You Use A Pump
Whatever pump you may use, combining pumping with hand expression can help you express more milk more effectively.
  • Breast massage and hand expression can be used at the beginning to get your milk flowing.
  • Breast massage while pumping increases the amount of  milk you can express.
  • Continuing to hand express can release milk remaining, even after the pump flow has stopped.
  • And if your pump breaks down, or there is no electricity, you alway shave your hands.
Practice Helps
Hand expression is simple to learn and gets easier with practice. You may receive information and a demonstration of hand expression from you midwife. Developing your own routine, starting with relaxation techniques and stimulating milk flow, makes it easier too.

How Breasts Work
When milk is removed more often, your breasts feel soft and comfortable and produce milk faster. When milk is removed infrequently, your breasts may feel full but produce milk more slowly. Frequent milk removal is the key to gaining milk production whether you are breastfeeding or expressing. Expressing stimulates your breasts-though not as effectively as baby- to make and release milk.

Before You Start
Wash your hands. Have a suitable clean container available to collect your milk; colostrum can be expressed into a small (5ml) container or even onto a teaspoon for immediate feeding. Once milk production has increased milk may spray in several directs so a bowl, wide mouthed container or a bottle with a funnel might be more practical. 

Relax And Get Comfortable
Milk tends to flow better when you are feeling comfortable, relaxed and arm. Tension or anxiety inhibits milk flow. Relaxation techniques can help increase the amount of milk you can express. The sound of running water may help, or you could practice in the bath or shower. 

Seek privacy; try the breathing exercises you earned for use during labor; visualize flowing milk. Have your baby nearby, or thin of him/her. Use photos or recordings of your baby and smell his/her clothing. All these will help stimulate milk flow. Take a few deep breaths, drop you shoulders and please tension with each exhalation. Bending forward with your breast suspended means gravity can help milk flow.

How To Hand Express

One Basic Approach
  1. Start by encouraging milk flow in both breast.
  2. Then hand express from each breast until milk flow slows right down. If you need to increase milk production, continue expressing for a couple of minutes after milk flow has stopped.
  3. Repeat these two steps at least twice more. You will find milk flow slows or stops sooner each time you repeat.
  4. Most mothers adapt the above approach to suit themselves, so experiment to find what works best for you.
Step by Step

Encouraging milk flow
Stimulating you r milk ejection relax (MER or 'let-down') is key to expressing. It can take a few minutes. You may see drops of colostrum or breastmilk, or even experience a tingling sensation, but many mothers don't see any milk until they start actually expressing. Experiment with the following suggestions to find out what works best for you.
  • Massage your breast starting at the top, using a firm circular pressure on one spot. After a few seconds, lift up your fingers to move to the next area on the breast. Spiral around the breast towards the areola and nipple.
  • Storke your breast from the top of the breast to the areola and nipple. Light stroking with fingers is one option, or use a soft item with a light tick-like stroke. Continue this stroking motion from the chest wall to the nipple around the whole breast. She your breast gently while leaning forward so gravity can help your ;milk flow.
Hand Position
You can use either or both hands on one breast, or express both breasts at the same time. Hold your hand in the shape of a letter 'C', with your thumb and forefinger behind the base of you ripple, feeling for the change in texture of your breast. Move your fingers closer to, or away from your nipple to find the best place for you.

To Express
Start with the pad of your thong at the top of your breast, and your finger pads below.


How Long Will Hand Expression Take?
Allow plenty of time at first: the whole process may take 20-30 minutes, but you can always stop and start again later if you need to. Frequent short sessions are usually more effective that infrequent longer expressing sessions.

Switching between breasts several times as milk flow slows can help trigger further milk ejection reflexes. The more MERs you stimulate, the more milk you will be able to express and make.

Hand Expression Shouldn't Hurt
Squeezing, pulling and sliding fingers along the skin can cause discomfort, bruising and skin burns. Pain of discomfort inhibit the MER and are signs the something needs adjusting. If your breast feels engorged or tender try warm moist heat immediately before expressing. Start expressing from the most comfortable areas.

Removing milk from areas around a blocked duct can reduce the discomfort, making it easier to express from the tender area later. 

Source: https://www.laleche.org.uk/hand-expression-of-breastmilk/ Written by Sue Upston, Karen Butler and mothers of LLLGB

Storing Breastmilk

Breastmilk's antibacterial properties help it stay fresh. The live cells and antibodies that discourage the growth of bacteria in your baby's intestines also guard against bacterial growth when your milk is stored in a container. 

The guidelines that follow apply to milk that will be give to full-term healthy babies. If your baby is premature or sick, hospital staff can give you information on stricter storage guidelines, to ensure your baby gets as much benefit from your milk as possible. 

Cleanliness
Good hygiene is important when storing your milk. Reduce the risk of contaminating your milk by:

  • Washing hands before expressing or handling milk
  • Keeping your pump clean, using hot soapy water for all parts which come into contact with your milk. Some mothers sterilize as well
  • Keeping your fridge, freezer, cool bag and icepacks clean
  • Placing containers of milk in a clean bag or lidded box before storing
  • Keeping your milk away from meat, eggs, etc
Storage containers
Hard-sided containers, either glass or plastic, do the best job of protecting your breastmilk. Avoid containers made with the controversial chemicals bisphenol A, identified with a number 3 or 7 in the recycling symbols. A safer alternative is polypropylene, which is soft and semi-cloudy and marked with a 5 or letters PP.
  • Use containers with well-fitting tops
  • Wash containers in hot, soapy water, rinse well, and allow to air-dry before use. Or wash and dry in a dishwasher
  • Leave 2.5cm of space at the top to allow the milk to expand as it freezes. Plastic milk storage bags, designed for freezing breastmilk are convenient and take up less room in the freezer
  • Avoid bags that are not designed for freezing- they may burst or or tear. Double bagging can prevent accidents
  • Some milk storage bags can be attache directly to a breast pump, so you can collect and store milk in the same container
  • Allow 2 to 3 cm for the milk to expand when frozen and squeeze out the air at the top before sealing
  • Stand the bags in another container on the fridge shelf or in the freezer 
Remember to date the containers- it can help to put a use-by date too. Add your baby's name if he/she will receive the milk at childcare or a nursery. 

How much milk will I need?
Store milk in 60 to 120ml (2-4oz) quantities to avoid waste, at least until you know how much milk your baby takes at a feeding. Small quantities thaw quickly and can be combined if needed. You can also store smaller quantities of 30ml for when your baby is extra hungry, or wants to be fed just before you're due back.

You can combine milk pumped at different times, if you:
  • Cool fresh milk for 30 min in the fridge first
  • Add fresh milk to frozen milk only if there is less fresh milk than frozen
  • Use it within the time limit of the oldest expressed milk
Looks are deceptive!
It's perfectly normal for expressed milk to look thin, bluish, yellowish or even brownish in color and for it to separate into a milk layer and a cream (fat) layer when stored. 

Preparing to use
Thaw and heat with care
High temperatures or even moderate temperatures over a period of time affect many of the beneficial properties of breastmilk, so:
  • NEVER warm breastmilk in a pan on a stove
  • NEVER warm breastmilk in a microwave
Microwaves do not heat liquids evenly, so there may be hot spots in the container of milk, and this can be dangerous for babies.

Defrosting frozen breastmilk
Your milk can be deformed in the fridge, avoiding  unnecessary heating. Use within 24 hours. BREASTMILK CANNOT BE REFROZEN ONCE THAWED.

To defrost your milk more quickly:
  • Hold the container under cool running water and gradually increase the temperature of the water to heat the milk to feeding temperature
  • Immerse the container in a bowl of warm water, Take the milk out and reheat the water if necessary. Do not stand in a pan of water heading on the stove
Refrigerated Milk: Warm for a few minutes under a tap or in a container of water. Test for temperature on the inside of your wrist.
Avoid contamination: Dry the containers before opening, with paper towels or a clean tea towel.
Breastmilk separates naturally: Gently swirl the container to remix. (see my post on swirling vs shaking here)

Storage
Breastmilk is remarkably resilient - it stores well due to its antibacterial properties.

Temperature: Store milk in the coldest part of fridge and freezer. Self-defrosting freezers can have warm spots. Use fridge and freezer thermometers to determine where the temperature is most constant. The fresher your milk, the better.

Milk stored in the fridge will have more goodness than frozen milk. Some of the anti-infective properties are lost when milk is frozen- but it still helps protect babies from diseases and allergies and is far superior to any formula. Although you probably won't plan to keep your m ilk in the fridge for set or eight days, it's good to know you can use safely any you find hidden at the back of the fridge. When your baby gets your milk within a few days of being refrigerated, its's also reassuring to know it is well within its usable limits.


Keeping milk for the next feed
Some sources will tell you to throw away leftover frozen or heated milk, which will have lost some of its antibacterial properties. Instead, check out this post for some ideas on what to use breastmilk for that is no longer safe for consumption. It isn't known how safe it is to keep fresh breastmilk left in the bottle after a feeding. It should certainly be used within 1-2 hours. Avoid eating previous milk by offering small amounts at a feeding.

Away from home
Expressed breastmilk can be kept in a common fridge at work or at the childcare center. Label clearly. If a fridge isn't available, place it in an insulated container with deep frozen icepacks. With enough icepacks, milk will stay at fridge temperatures for us to 24 hours. Icepacks are also useful when carrying milk home from work or to childcare, especially on warm days. But breastmilk can be safely refrigerated or frozen after shortchanged periods of storage at hight temperatures.

Soapy smell? Rancid smell?
If you plan to store large amounts you could try freezing a small batch for a week before defrosting and tasting it. Some mothers notice their milk smells slightly soapy once defrosted, sue to high levels of lipase, the enzyme that breaks down fat. The milk is still safe to use but some babies refuse to drink it. Heating milk to a scald (bubbles around the edges, not boiling) then quickly cooling it before freezing can deactivate the lipase.

Thrush
Freezing deactivates yeast but doesn't kill it, but there is no current evidence the milk frozen when you and your baby have thrush with reinfect you later.

There isn't yet complete agreement about storage times. But it's always preferable to store milk for as short a time as possible to ensure:
  • Minimal growth of bacteria
  • Minimal loss of antibodies and nutrients
Laboratory studies have shown that breastmilk becomes less resistant to bacteria with time, but most of the bacteria found in breastmilk are harmless skin bacteria and not illness-causing ones.

The longer you store your milk, the more care you need to take about:
  • Cleanliness while expressing, storing and handling milk
  • Storing milk at appropriate temperatures (use fridge and freezer thermometers)
  • Checking for bad taste and smell, which will show if your milk has gone off. If milk has gone bad, consider using it for other uses as mentioned in this post.
If any family members are ill, especially with scenes and diarrhea, your baby will be better off with fresh milk rather than frozen. The most recent milk from your stores will offer him/her the best protection from the illness. You may prefer not to freeze your milk until everyone is better.

Source: https://www.laleche.org.uk/storing-your-milk/#fulltermbaby written by Karen Butler, Sue Upstone and mothers of the La Leche League Great Britain 

To shake or to swirl your breastmilk, that is the question.

Weather you're new to lactation or a seasoned pro, Im sure you have heard about the controversy behind shaking or swirling breastmilk.

By now I'm sure you have noticed that when you store your breastmilk in the fridge the milk separates and it goes to the top of your container. Also some fat tends to stick to the sides as well. There is a huge variation as to the thickness of the fat, how clear the separated milk is, how much fat there is... even the color of the milk. There is a huge range that is considered normal. So if you're seeing this for the first time, don't worry, it's supposed to do that.
Now there are TONS of reputable sources that say you should NOT shake your breastmilk. 
From International Board Certified Lactation Consultants (IBCLCs) and Kelly Mom to Breastfeeding PlaceWhy is that? There are three primary reasons why expressed breastmilk should be swirled:
  • Shaking denatures proteins
  • Swirling helps to remove fat globules stuck to the side of the container
  • Shaking damages cells.

However, I found an interesting article here that shed light on those three aspects mentioned above. It's a lot of science and a lot of math and worth the read. The bottom lines are that in regards to shaking denatures proteins: there are a lot of variable when it comes to the proteins and there are no publishes papers on this topic. Since there are no studies in human milk, water was used as a substitute. The idea that shaking denatures proteins is based on the shear force of the proteins would be exposed to during shaking.

In regards to shaking damaging cells, it is highly unlikely that the human arm is capable of generating enough force to damage the cells in the milk. Breastmilk cells are likely exposed to high shear force at multiple points during their normal life course- from milk ejection to swallowing to digesting, and may be more resistant to cell damage than previously thought. 

And lastly, in regards to swirling helping to remove fat stuck to the side of the container... personally I think this is all based on preference. I know some moms who say their milk is so high in fat that they have to shake it to get all the fat off. Others like myself, have no problem with swirling to get milk off the container. 

In the end, there is no published evidence to support that shaking actually damages breastmilk when compared to swirling. However this in itself isn't enough proof, at least for me, that it in fact does not damage breastmilk. Bottom line is that not enough research has been done. 

Some have theories that its just another way for people to make breastfeeding seem harder than it really is. No matter what anyone says on the matter, it's up to mom to decided what she feels best for her and baby. If you wanna shake that bottle then go for it. If you wanna swirl it, then swirl to you hearts content. As mentioned before, I prefer to swirl. Not only do I find it more effective in removing milk from the container, but it also reduces the amount of air bubbles in the milk. And I prefer to be more cautious and not take chances with possibly destroying any cells. But that's just me.

Traveling While Pumping

As I mentioned in my previous post, I was going to be traveling and I had some concerns about how I was going to keep my ice packs frozen. So let me give you the breakdown of my trip.

We took a little mini vacay from Los Angeles to San Diego. So we weren't on the road for very long. Just about 2 hours or so. Typically, I like to pump every 3 hours and I had just pumped before we left. So I didn't have to pump again until after we checked in and got comfortable in our room. Our room was equipped with a small fridge. So that was perfect for keeping the milk I pumped cool. I had brought icepacks with me to take with me the next day. We planned to visit the San Diego Safari Park. I had called the hotel ahead of time to see what arrangements we could make to keep my icepacks frozen. They told me that they had a walk in freezer and that all I would have to do was put all my ice packs in a bag and label it with my room number and they would freeze it for me. When I checked in, I again asked about the freezer and they confirmed the same information with me. They took my icepacks and placed them overnight in the freezer for me. I let them know I would be back in the morning to pick them up.

Not gonna lie, I was concerned that somehow someone was going to drop the ball and I was looking for a back up plan for just in case. Luckily I saw an ice machine just down the hall from our room and I was already of thinking of ways I would store ice in my little cooler. 

The next morning I go to the lobby to pick up my icepacks. It was a new person from the night before in the lobby. He looked up the notes in the computer system and confirmed what the previous person told me. That my icepacks were in a walk in freezer. He paged for someone in housekeeping to go get them and bring them to the lobby. 10 minutes passed. He got a call back saying they didn't have any icepacks in the freezer. He insisted they look again. Another 10 min pass and once again they told him there was nothing. This is where panic started to hit me. I kept thinking "How am I going to keep this milk cold?! It's like 90 degrees out and this milk will spoil asap. What am I going to do? I an NOT dumping this milk!" The man at the front desk told me that some employees didn't know where the walk in freezer was but that he knew and that he would personally go look but that he couldn't go because he could not leave the lobby unattended and everyone else was in a meeting. He called up housekeeping again and spoke to another lady who said they found some packs and would bring them to the front. 5 minutes passed and she came into the lobby with a box of who knows what. I don't even know what they were but they didn't look like icepacks. I had to tell them that was not my bag of icepacks. Another maybe 10 minutes passed and he found another employee who knew where the walk in freezer was and he went in the back and emerged 10 min later with my bag of icepacks. THANK GOD. All in all, I waited about 40 min in the lobby for my icepacks. It was a huge inconvenience because my whole group was waiting outside for me as we were leaving to go to the Safari Park. And of course our car and my sisters car was packed with impatient crying kids. 


This whole finding the icepacks thing took so long that it was time for me to pump by the time I got in the car to head to the Safari Park. I didn't want my group to wait for me in a hot parking lot while I pumped, nor did I want the first thing for them to do once we entered the park was to wait for me to pump before they could see any of the attractions. So I decided to pump in the car on the way over there.(I was NOT driving) I realize it probably wasn't the safest thing to do. In the event we were in an accident I probably could have gotten seriously injured. However lucky for us, the hotel wasn't that far from the Safari Park and we weren't even driving for that long. I was able to pump discreetly while not making anyone wait for me. I finished pumping just as we pulled in, so it all worked out. (This was a first for me and probably a last too)

I had looked at the Safari Park's website ahead of time to see what kind of accommodations they had for nursing mothers. I read that they had a couple of first aid stations that had private rooms that some mothers use for pumping and nursing. In theory that sounded great. However once you get there you will know that this park is HUGE. And only having two locations dedicated to pumping/ nursing mothers isn't really convenient. (This is my second visit so I already knew before going that these rooms weren't going to work) But if you recall what I did in my travels last month, I used handicapped bathroom stalls to pump. This was going to be no different. Only it would be at a zoo. With no air conditioning. And it was about 90 degrees out. Plus Id be doing it with children some of the time.

PUMP BREAK #1


Because I was with a group, I decided I could push my pump breaks as far as every 4 hours instead of 3. However if I found the opportunity to pump at around 3 hours I would take it. My first stop for pumping went off without a hitch. My husband took the kids to play in a little playground while I took the stroller (which had all my pumping supplies) into the nearest bathroom. There was a handicapped stall but there was no outlet. That was quite alright as I always travel with my portable battery pack for my pump. The stall was HUGE. It was large enough for me to bring the stroller in the stall with me. I still had plenty of walking room too. This stall also had a changing table in it. Perfect to set up my pumping station. Also since this was around noon it wasn't too hot yet. So I appreciated a nice cool bathroom even if it didn't have any air conditioning. My pumping sessions usually take about 20-30 min. However I didn't want to have my group wait for me so long each time. And I also didn't want to occupy a stall for so long and keep other people waiting. Thankfully the bathroom was empty when I got there. No one was waiting for any stalls. About 10 minutes into my pumping I heard a mom come in with her kids. I overheard her talking to her children and said "we are going to wait for the big stall." Yikes. At that moment I felt the pressure to hurry up. I maybe lasted another 4-5 min before I heard her start to get impatient. I ended my session a little early and started to clean up. Clean up can take a bit. I need to disconnect everything. Put it away. And then put the milk in my storage cooler. By the time I was done she had already left. Oh well. 

PUMP BREAK #2

Another 4 hours later was my second pump session. This time I was in a totally different area of the Safari Park. And this time I also had my two daughters with me, ages 7 and 18 months. I already knew this session was going to be more challenging because I had some of my children with me. This bathroom did have a handicapped stall but it did not have a changing table. The stall was also MUCH smaller. I had to get creative. Luckily it had a little windowsill where I placed the pump. It was at the perfect level too so that I could stand to pump. Otherwise I would have been forced to put it on the floor and had to hunch over while pumping. Not fun. By this time it was around 4:00 in the afternoon and it was HOT. As I was standing there pumping, beads of sweat were dripping down my face and well, pretty much everything else too. My 18 month old was getting very impatient in the stroller. I had to try desperately to entertain her long enough for me to be able to get a decent pump session in. I gave her everything from my phone to toilet paper to play with. (She liked the toilet paper better lol) My other daughter was just bored and complained the whole time. Yippee. Thankfully no one else needed to use the handicapped stall. I was able to get a 20 min session in. 

By the time we left it was time for another pump session. We had already checked out of the hotel as we were only staying for a night, but someone else in our group was staying an extra day. So I used their room bathroom and had one last session before heading home on another 2 hour car ride back to Los Angeles. My icepacks were still cold. The milk was still good. And by the time we got back home and unloaded the car, it was time for another session. Everything worked out perfectly and I never missed a pumping session. Im so proud about that. 


Sunday, June 11, 2017

Flying with breastmilk

I didn't think there were many new things I would encounter on my breastfeeding journey since Ive been doing it so long, but I was wrong. 

I had flown before just once while lactating, although I wasn't producing nearly as much milk as I am now. I suddenly found myself in a situation where I had to take a last minute flight out of town for a day. Naturally I would have to bring my pump and also pump while I was traveling. I wanted to share my tips and tricks that Ive learned along the way with you. But keep in mind, I do not travel a lot. I hardly fly. And Im in no way a pro at flying while pumping. There are plenty of other moms out there who have much more experience. So if you are one of those moms, feel free to comment below with any additional tips you have.

First thing I did was call my airline to get info from them. I happened to be flying Alaska Airlines. Of course they state the TSA's guidelines of the 311 rule that can be found here.


Breastmilk and formula however are considered an exempt liquid and you should be able to take larger quantities onboard.... within reason. Now its the "within reason" part that causes problems. I have heard my share of horror stories of moms having really hard times getting breastmilk though. I don't know the actual percentage of those who hit obstacles but there are plenty. The stories Ive heard include them telling moms they can't bring it at all and make them dump their milk. Ive heard that they go through a testing process that ruins the milk. Ive heard of moms being taken to private rooms and humiliated with exams and being forced to pump in front of a TSA agent. These stories are terrible. I think part of it has to do with the particular Agent(s) you are dealing with. The airport you are at may even have a part of it. There really are so many factors. Odds are that everything will be ok but I knew that these types of things happen unfortunately. So it made me nervous. I also contacted TSA directly and spoke with an agent. They can be contacted at the number below:


So again, I can only speak for my particular experience. The TSA agent I spoke to was the one who told me breastmilk is an exempt liquid that can have higher quantities that the 311 rule. There is no exact limit though as to how much you can bring. The "within reason" rule is really subject to your TSA agent. Thankfully I pumped before getting to the airpot from my departure. I was able to bring my breast pump on my carry on without a problem at all. You can also bring small coolers with get ice packs. Not a problem. I know some moms even bring larger coolers packed with dry ice to check in. I personally do not have experience with that but if anyone does I would love to hear how you do that (Ive also seem moms ship their milk back home, so that may be a good alternative option for some). 


Once I got through TSA though I needed to pump at the airport. Again it really depends on the airport. I flew out of LAX last minute and was pressed for time. I found online that they did have lactation rooms however I didnt see any while I was there. They weren't easy to spot or at least not near my gate. My alternative was finding a bathroom to pump in. Not ideal but I made it work. My first tip is to find a handicapped stall. I have found that the majority of them usually have an outlet in them. Thankfully I was able to use my luggage to keep my pump off the floor. There really was nowhere to put my bottles and cooler, so as much as Id like to keep if off the disgusting floor, I did for a moment have to put the full bottles down to avoid spilling them. You just have to be real careful not to contaminate the milk. 


I flew into Seattle to the Tacoma Airport and finding a handicapped stall with an outlet proved to be much harder. The first bathroom I saw was totally closed due to repairs or something. The second bathroom I found had 3 handicapped stalls and none had an outlet. And the third bathroom I found had its handicapped stall out of order and locked. I was pretty desperate at this point. I finally found a family bathroom. It was there that I found an outlet. It actually had 2 outlets. Some have benches and counters to put your supplies on as well. Mine didn't have a bench but it did have a little ledge under the mirror which was perfect to place my pump on and to put my bottles on. If I had not found one then I probably would have just asked for a lactation room or something similar for an employee to direct me to. But thankfully it worked out for me. 


 Now here is another thing to think about. I personally was not staying in a hotel. And even if I was, not all hotel rooms have a fridge or a freezer. I needed both to freeze my ice pack and to keep my milk cold. I was a little worried as to how I was going to do that. I actually went from the airport to a hospital to see a family member. I explained my needs to the hospital staff and they were more than accommodating. Willing to freeze my ice pack and keep my milk cold. They didn't have a problem with me asking for my cooler ever 3-4 hours to add my milk to the bottles. They were absolutely wonderful. I was also concerned that my supply would take a hit since I didn't bring any of my milk increasing supplements with me. (ok I actually did take 4 lactation cookies, but left the motherlove products and teas). To my surprise my milk actually increased. Probably because I was more on top of pumping and also because I didn't have my baby there to nurse in addition to pump. 

Getting back to the airport to fly back home I did have milk with me. About 12oz to be exact. I pumped about an hour before leaving for the airport. They say to get there two hours before your flight so that you can get through security. I followed the TSA's rules of letting them know I have breastmilk with me. Now here is where I find different info. Again, could be based on the airport you are at. On the website it says you have two options, either let them put the milk through the X-ray scanner or let them test it. Some moms have a problem with putting it through the X-ray scanner as there is some concern as to weather it damages the property of the milk. There is no solid evidence to support this as far as I know. So its really a personal choice. I honestly wasn't given a choice, they just took my milk for testing. Im not sure how they actually test it or what they are testing it for. I know that it took a couple extra minutes and they took it to a separate counter all in front of. They brought it back and said it was fine. I was so relieved. By the time I went through security it was time to pump again and I found a bathroom and pumped. By the time I got on the flight I had about 15-16 oz of breastmilk with me. They do not check any liquids after passing through the TSA so you don't have to worry about that. The actual airline will allow whatever you have. I had an agent from Alaska Airlines say that they honestly don't care what you bring on board. If you made it through TSA then thats all that matters.

I am going to be experiencing one more traveling while pumping concern in the next few weeks though. Im going to be taking a two day mini vacation out of town. The hotel we are staying at has a fridge in the room. Im not sure it comes with a freezer. I absolutely need one. So I will update the blog after my trip to let you know how it goes. I certainly hope the hotel accommodates me and is able to keep my ice packs frozen.